Zucchini Pasta with Creamy Avocado Sauce

DSC_0623I don’t think I have ever met anyone that didn’t love pasta.   I love all pasta!  I love the refined carb pasta that I rarely eat anymore because there are so many delicious, healthier alternatives, I love brown rice pasta, I love kelp noodles, and I love raw zucchini noodles, just to name a few.

Getting a spiralizer was the best addition I have made to my kitchen since getting my Vitamix four years ago.  I went through a number of different spiralizers until finding this one – which is incredible!!  So, for anyone wondering about spiralizers, get the paderno.  It is SO easy to use and to clean and works perfectly every time!  In fact, it is so simple and fast to use that this dish took me maybe 5 minutes.  Imagine that!  A yummy, creamy pasta dish in five minutes.

DSC_0628

If you have not delved into the world of raw food yet, this is the perfect recipe to try.  I love raw food because it tastes so clean and speaking of taste – you can actually taste all the ingredients in the food because everything is so fresh and there was no heating or processed ingredients to alter the taste.

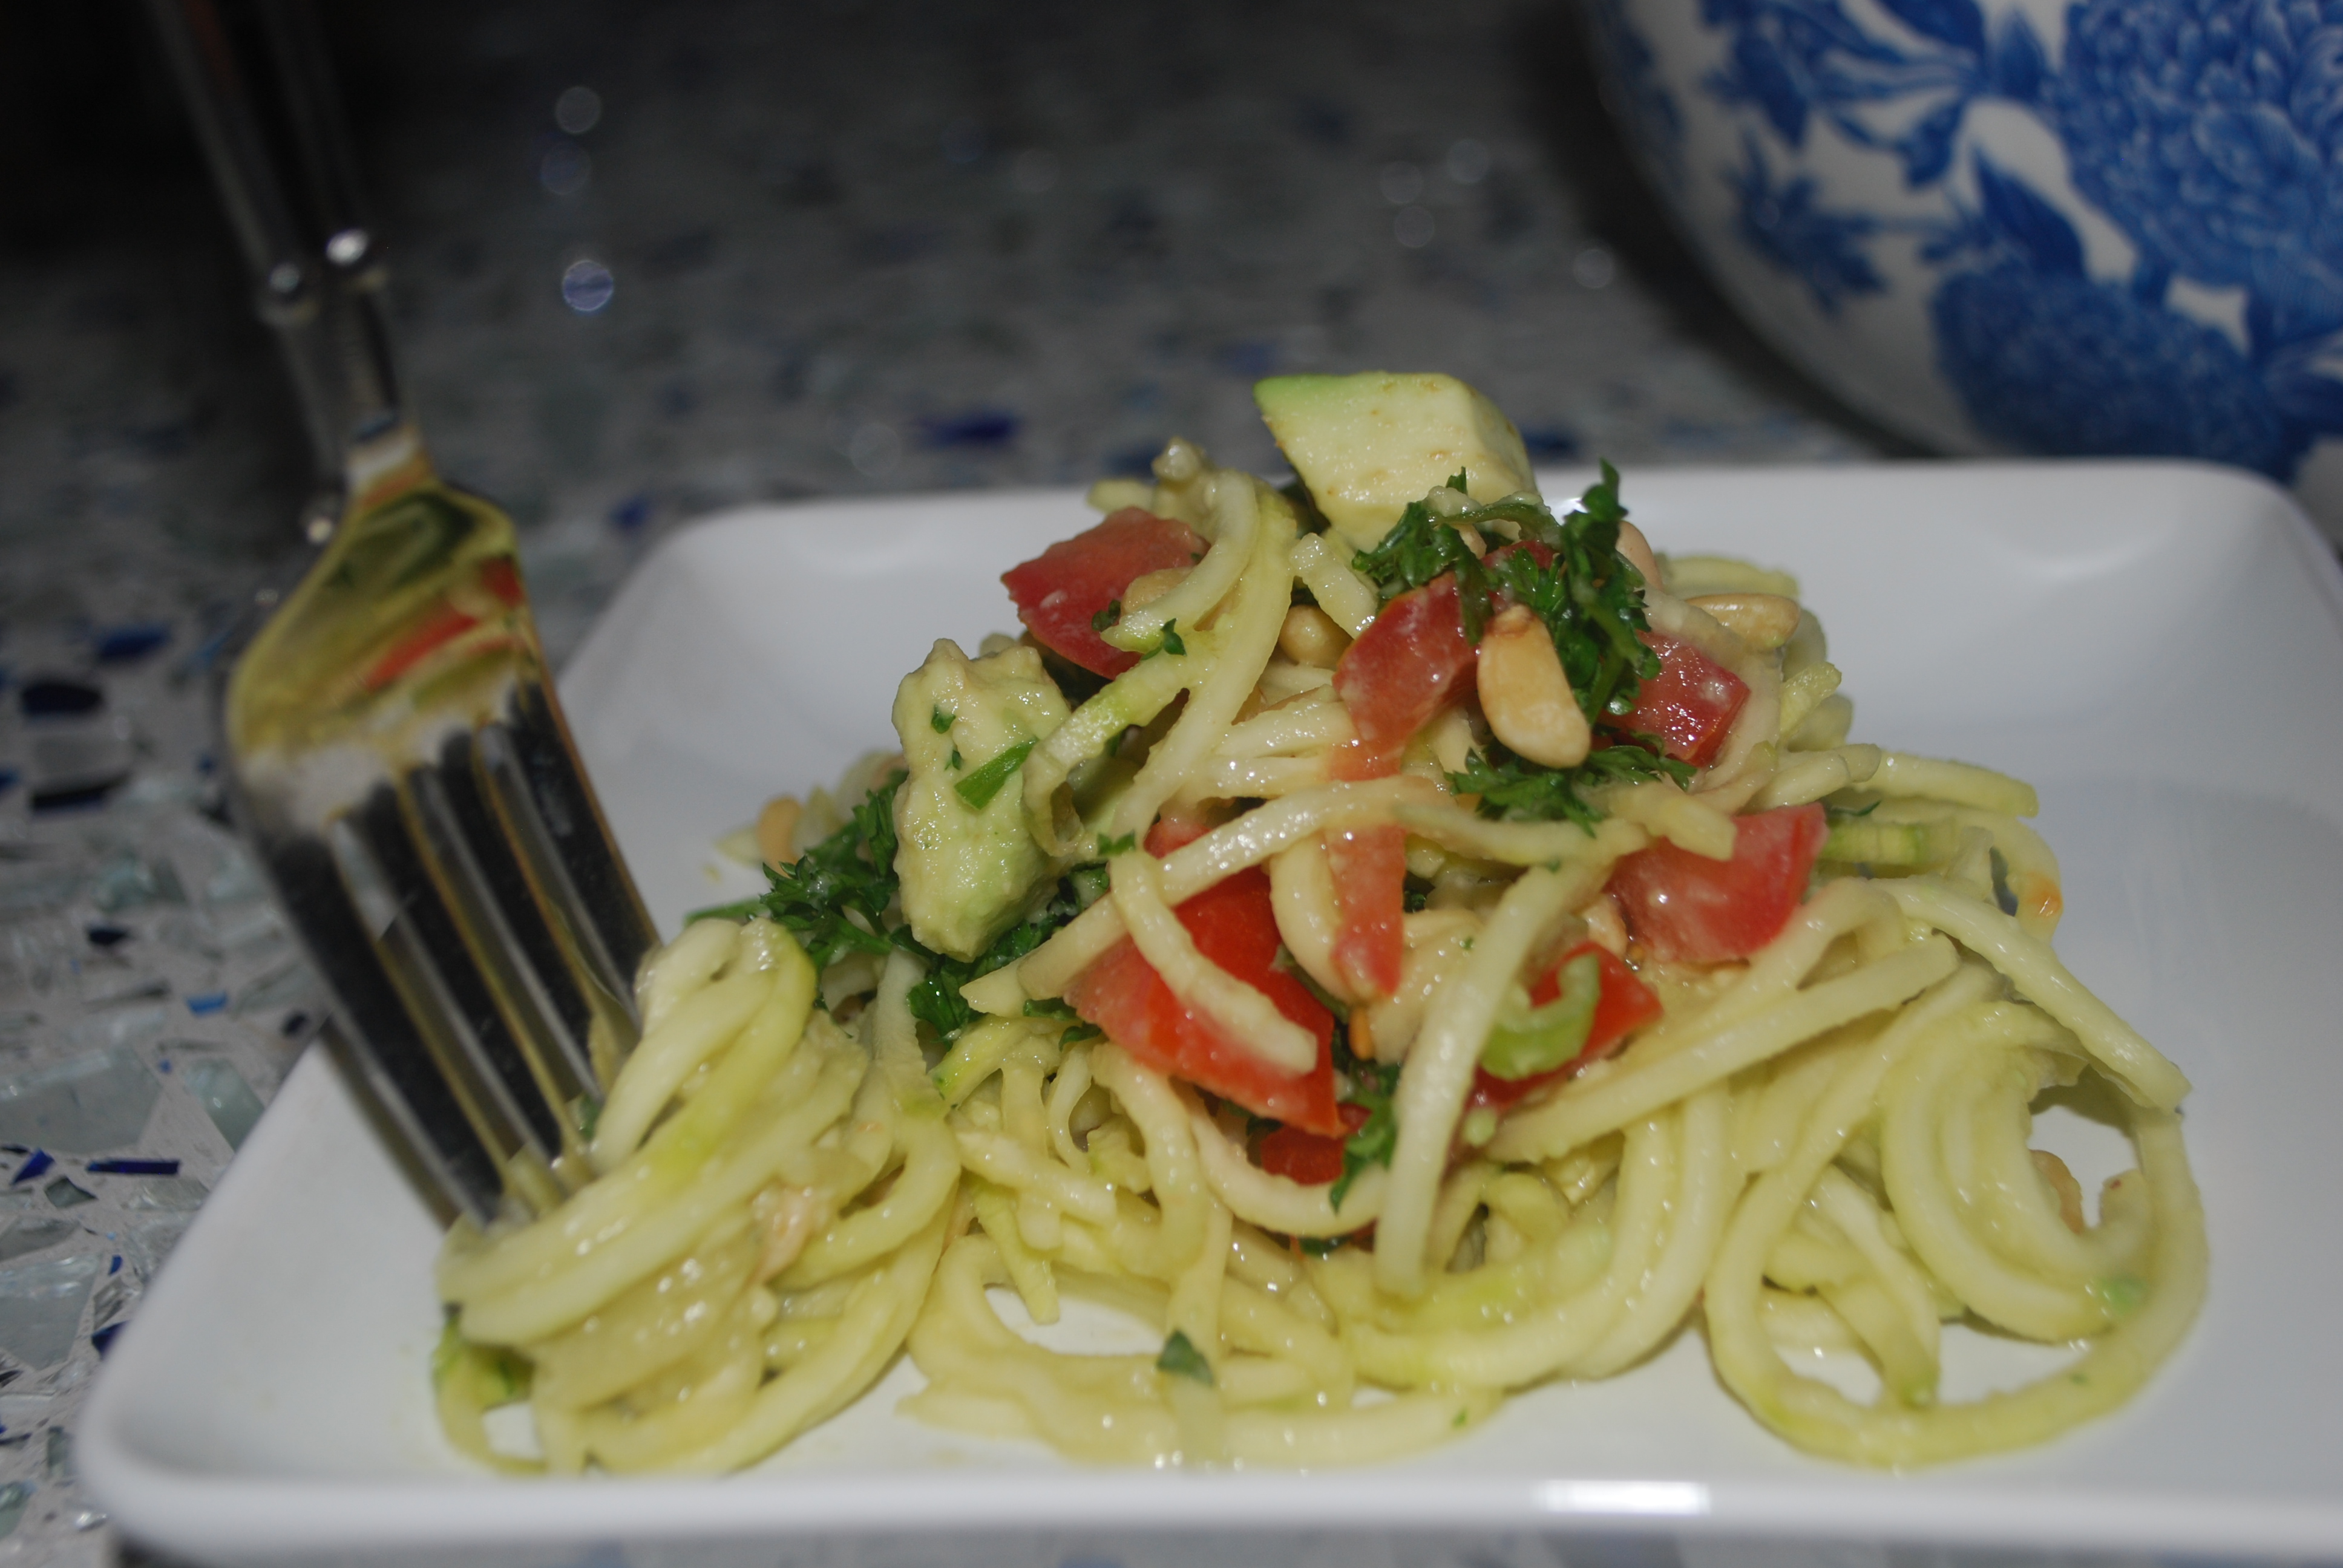
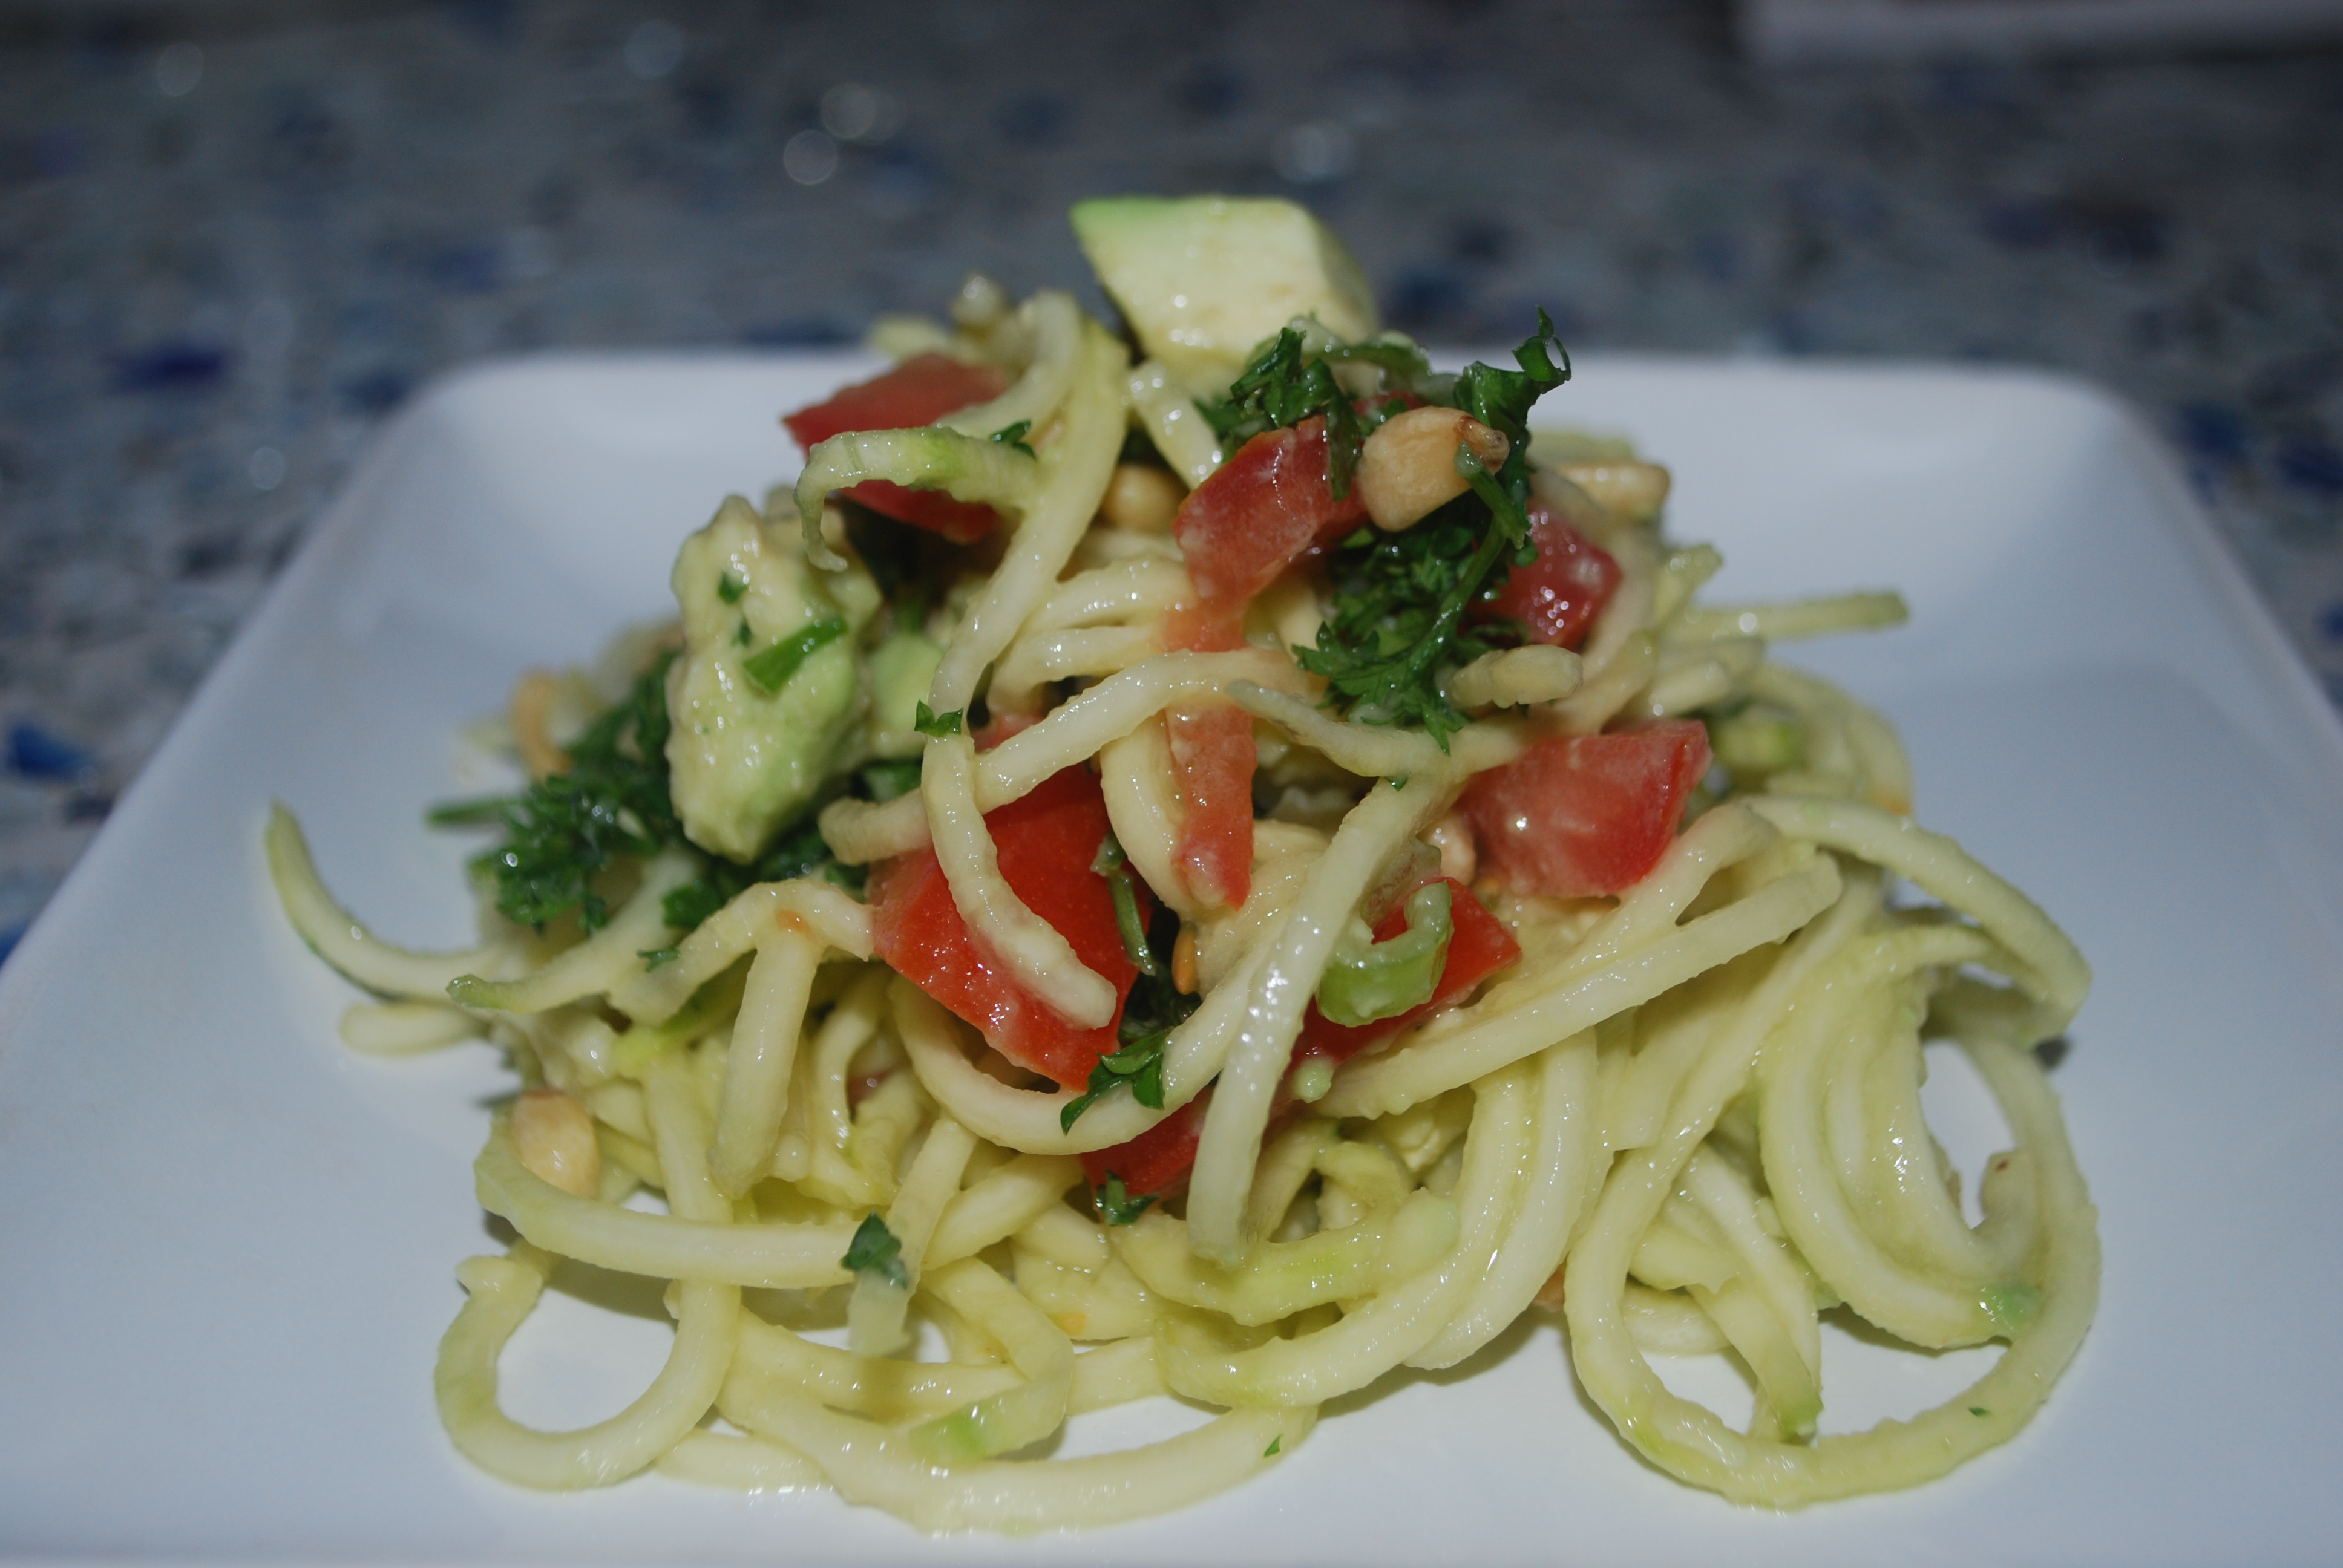
This is my go to raw pasta dish.  It really satisfies any pasta craving, but your body will be thanking you after, instead of wanting a nap!

  • 1 large zucchini, peeled
  • 1 avocado, divided
  • 1/2 tomato, diced
  • 2 – 3 T pine nuts
  • 1 scallion chopped, green part only
  • 2 T chopped parsley
  • 1 t cider vinegar
  • 1 t coconut aminos (or soy sauce)
  • 3 pinches salt
  • 2 pinches garlic powder

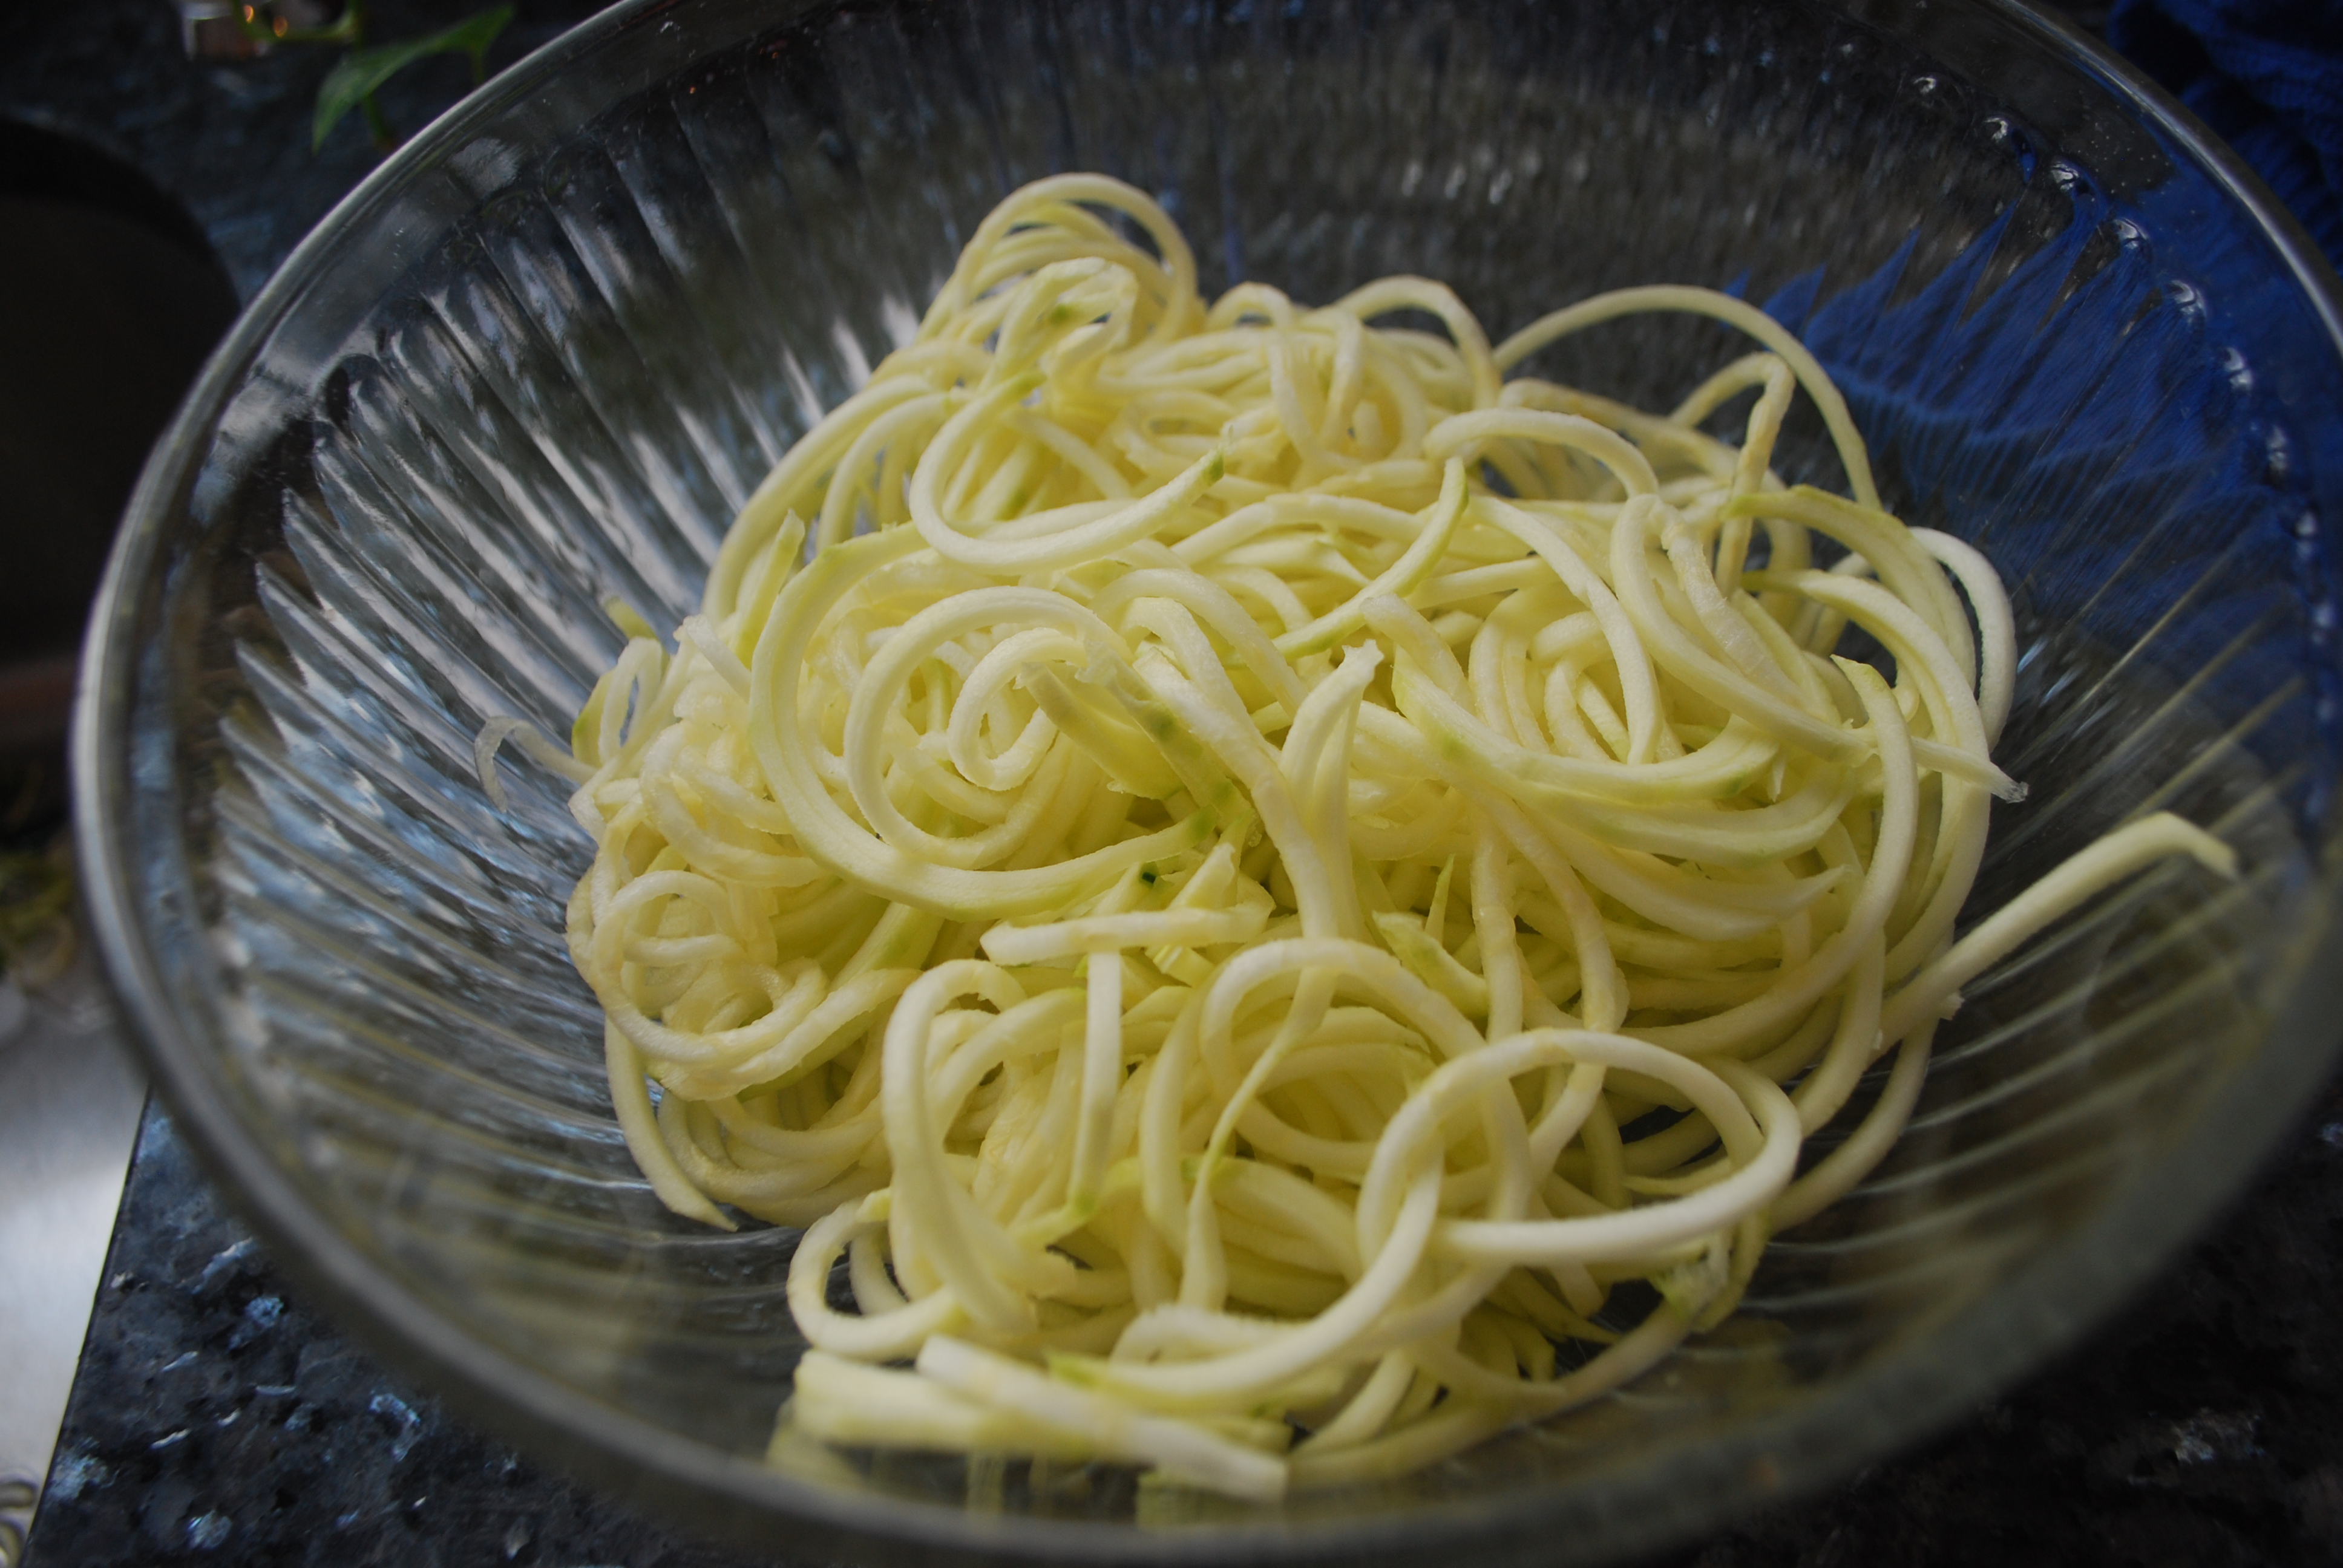
Spiralize the zucchini.  I used the medium blade.

DSC_0615_2

DSC_0617

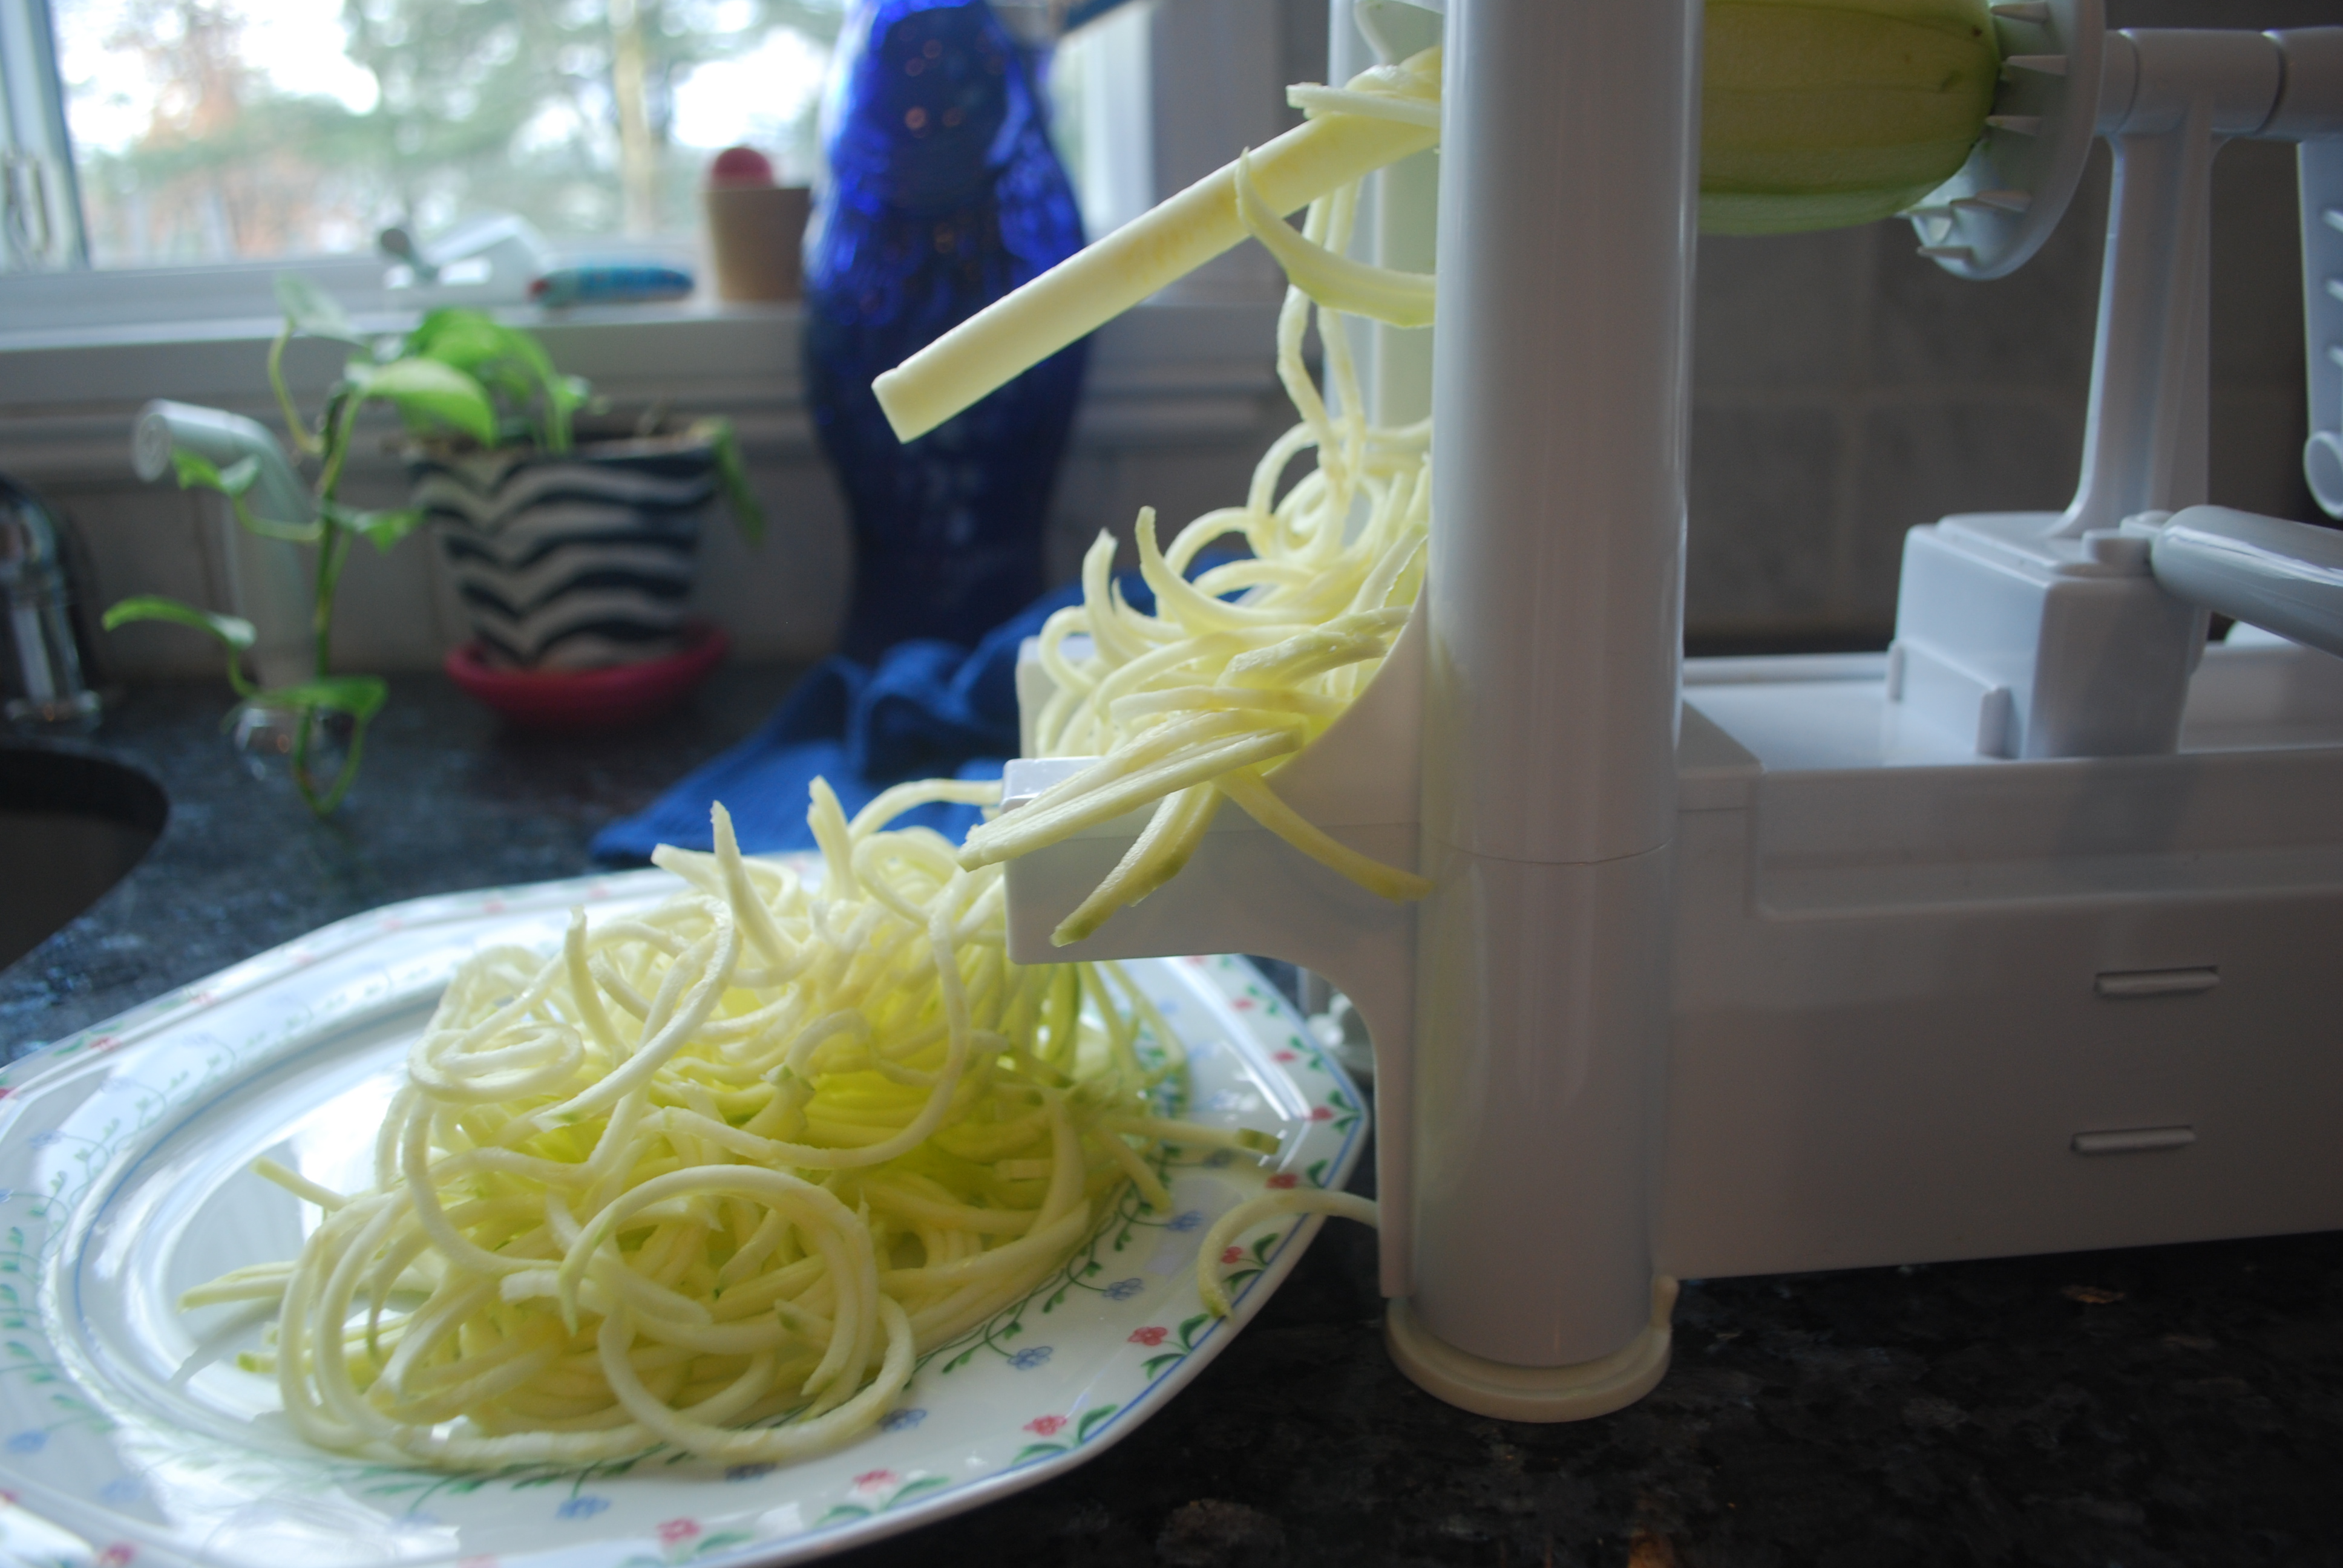
Place zucchini pasta in a bowl and set aside.

DSC_0618

In a small bowl, mash half the avocado.  Stir in 1 T water, salt, garlic powder, vinegar, and aminos.  Combine well.

DSC_0619

Pour over pasta and combine well with your hands.  You can use a spoon, but it really works best with hands!

Add the scallion, parsley, tomato and the other half of the avocado, chopped.
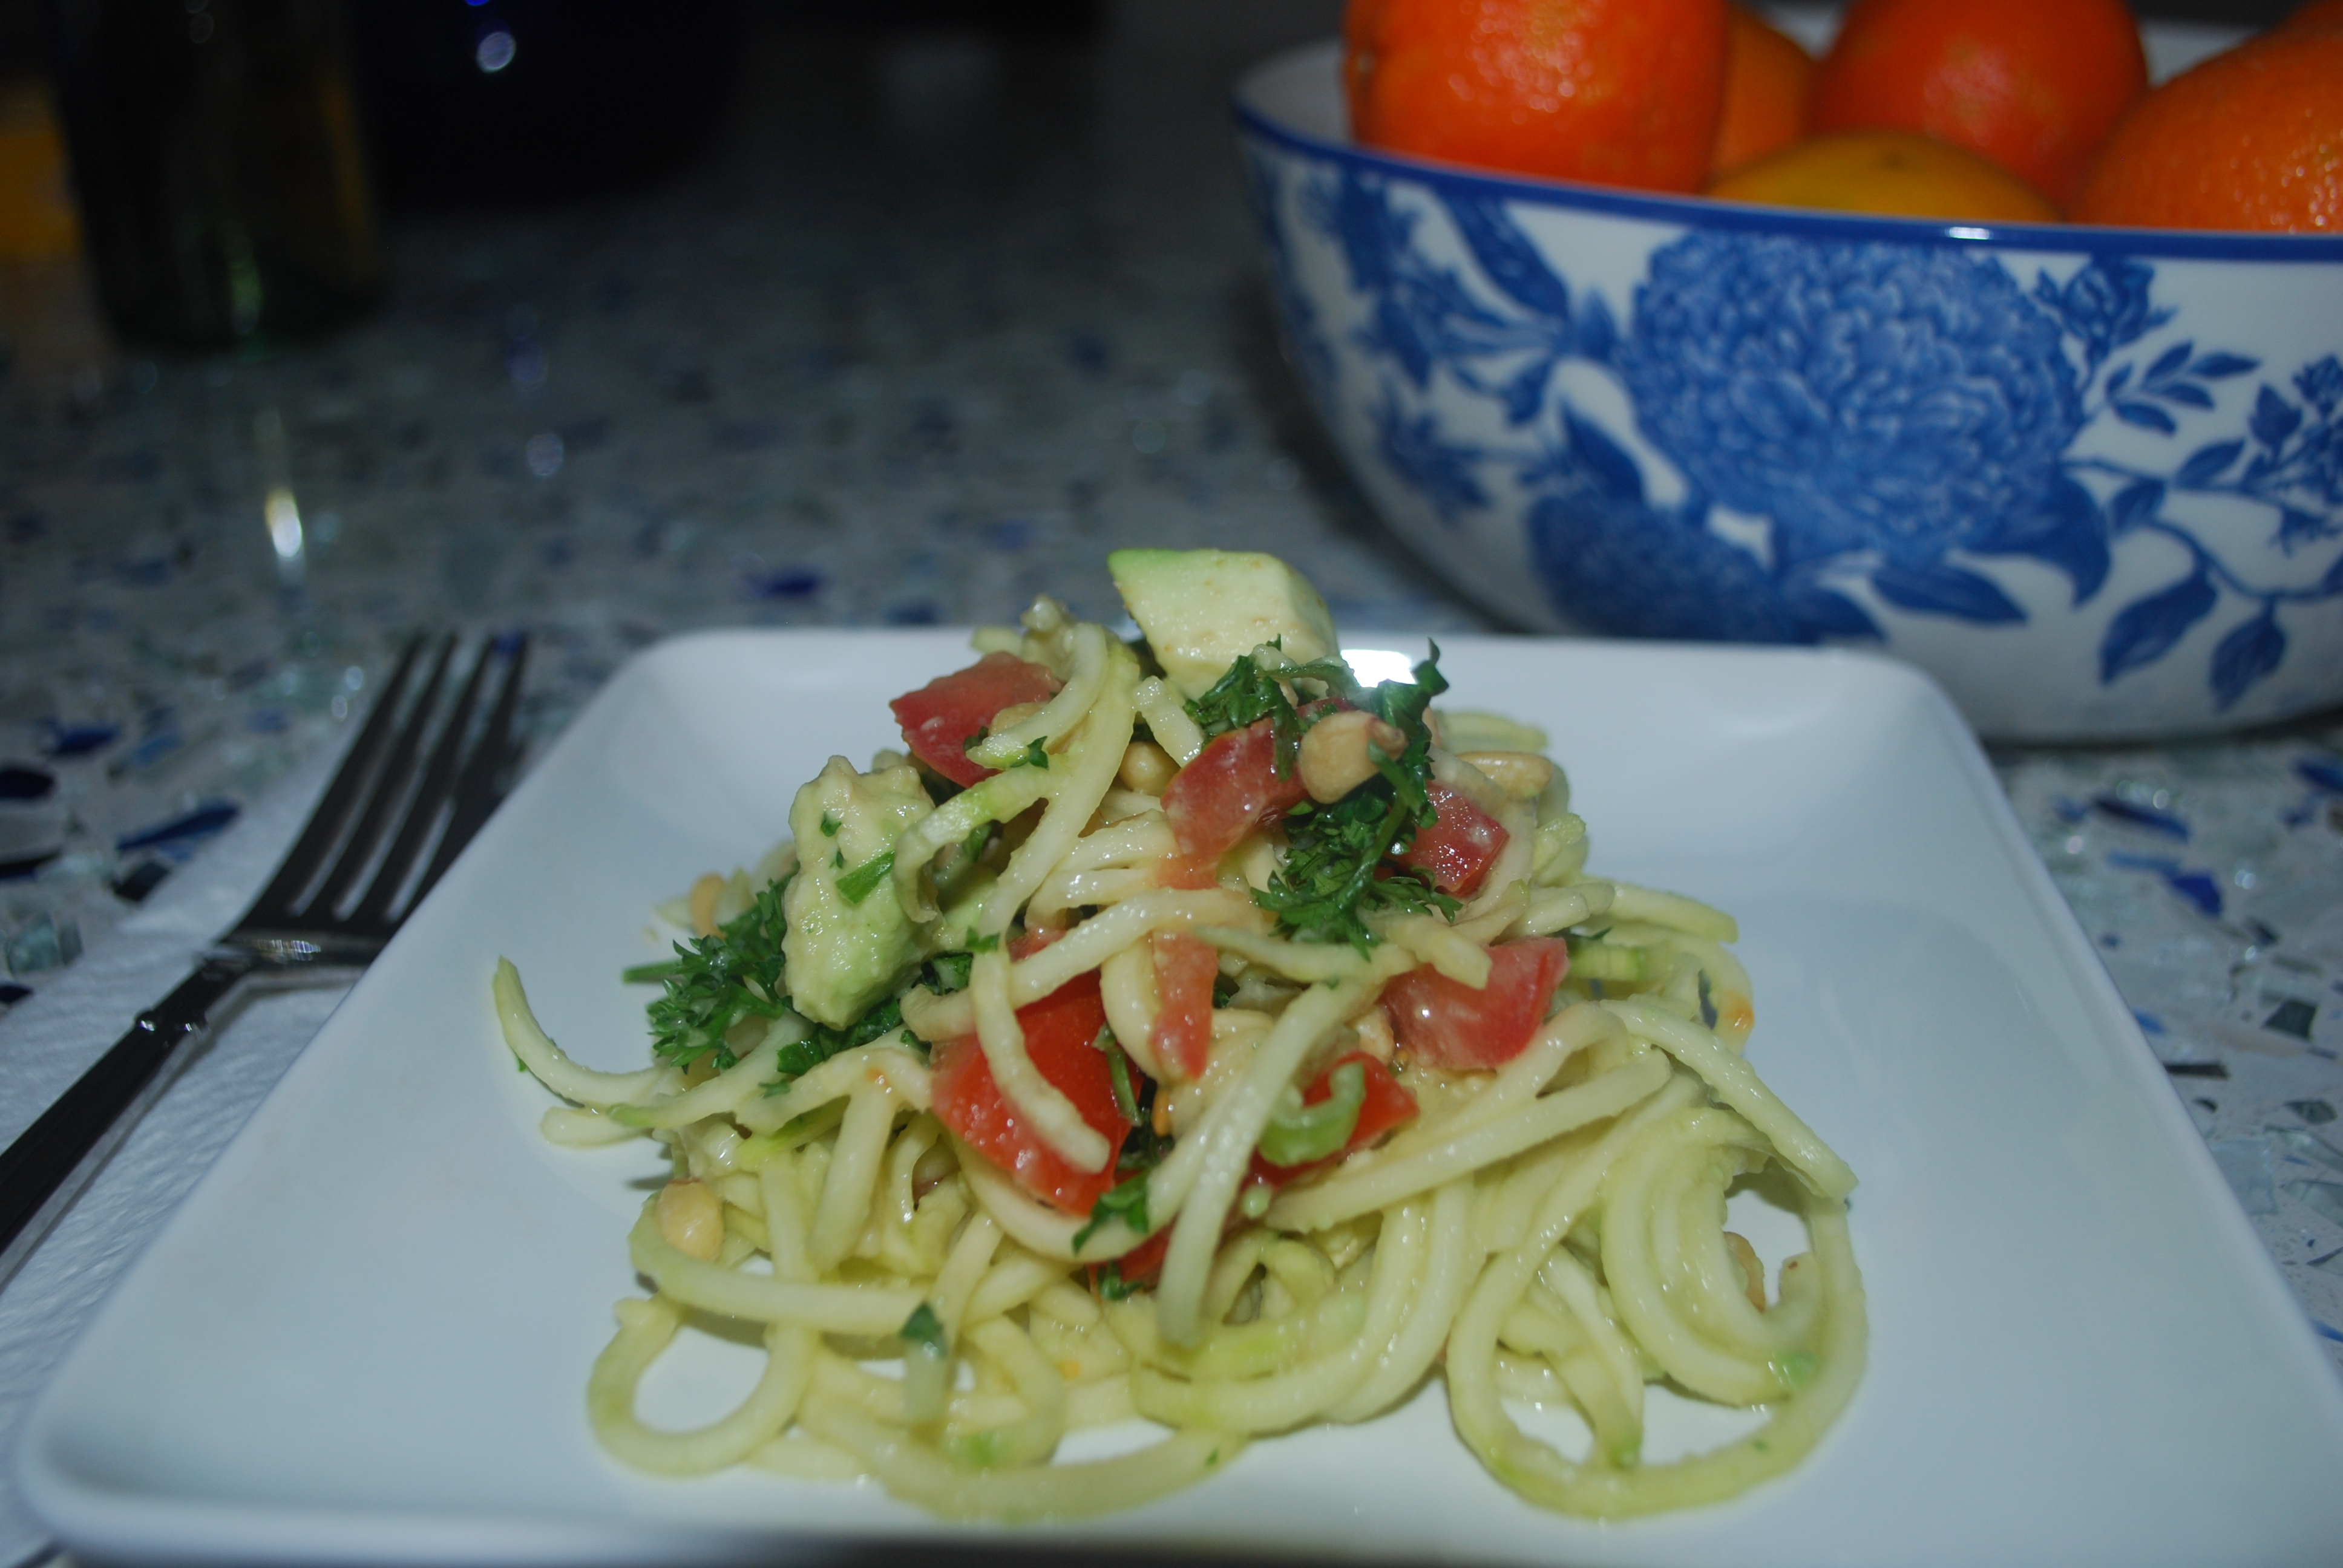
DSC_0632

Serve immediately.

Serves 2 for dinner or 3-4 as an appetizer.

DSC_0637DSC_0625

Not in my tonic water!

DSCN0257I want to share something I recently learned with all my wonderful followers.

Every now and then I enjoy a good vodka tonic or gin and tonic and I assumed I knew what I was drinking.  But – that was most definitely not the case.  Thanks to my brother, I became aware that most tonic waters contain high fructose corn syrup.  Yikes!  I didn’t know that.  I assumed it was basically water.  I don’t know about you, but I do not want to be consuming high fructose corn syrup…ever.

Enter Q Tonic.  I can’t say enough about it!  It is awesome stuff!  It’s vegan, it’s delicious and its ingredients are all natural!  It tastes so clean and real.  The drinks I make with it take on a whole new meaning; I can now see that the drinks I used to make with Schweppes, for example, tasted artificial.

It does cost more money, but since I don’t drink often, when I do, I think it’s worth some extra money to drink well!

Salud –  to your health!  Don’t drink crap!  I am so glad that I know about tonic water and I hope you are glad that I shared it with you!

Click here for a perfect gin and tonic recipe.

DSCN0259

Chocolate-Covered Pumpkin Candy

bunchI LOVE autumn!  It is without a doubt my favorite season and I never tire of seeing the gorgeous foliage which reminds me how magnificent nature is.  As soon as that fall crispness hits the air, I start making all my favorite fall recipes and even start planning my Thanksgiving menu.  Fall comfort foods are definitely my favorite (disclaimer – coconut ice cream is not just for summer) and I practically worship stuffing with gravy and roasted sweet potatoes.  This year, since I have begun to obsess over raw desserts, I wanted to try to make something with pumpkin, the ultimate mascot of edible fall.  This pumpkin candy is so fabulous.  It melts in your mouth and makes me completely forget about those chemical, pus infused, cruel and awful for your health snickers, milky ways and kit kats.  Seriously, once you start eating raw desserts, you lose interest in the artificial crap with refined sugar.  This is what chocolate is meant to  taste like.  And this recipe is so very simple to make.  This is a treat you can feel great about sharing with your loved ones!

238

Crust:

  • 1 cup raw cashews
  • 1/2 cup dates (about 8 medjool)
  • 1/4 cup plus 2 T cocoa powder
  • 2 T maple syrup
  • pinch salt

Filling:

  • 1/2 cup dates (about 8 medjool)
  • 1 1/2 cup raw cashews
  • 1 1/2 t vanilla
  • 1 cup canned pumpkin
  • 3/4 t cinnamon
  • pinch salt

Chocolate:

  • 1/2 cup coconut oil
  • 3/4 cup cocoa powder
  • 1/8 t salt
  • 1/4 t vanilla
  • 1/2 cup agave nectar

DSCN0221

Place all crust ingredients in food processor and process until it forms a large ball.

DSCN0200

Roll into about 50 little balls and then place on aluminum foil and flatten each with 2 fingers.  They should be about the size of a US nickel.  Place in freezer while making the filling.

DSCN0205

Place all filling ingredients in processor and process until smooth.

DSCN0207

Place 1/2 t filling on each disc of crust and place in freezer again for at least an hour.

DSCN0211

Note – You will have extra filling and could probably get away with halving the filling ingredients, but I love having extra.  I keep it in the fridge for 5 or so days and always find ways to enjoy it.  My favorite is to put a scoop on my oatmeal in the mornings.  What a heavenly breakfast.

Once at least an hour has passed, melt the coconut oil in a large glass bowl in 10 second increments in the microwave until liquid.  Add remaining chocolate ingredients and stir until smooth.

DSCN0213

Drop each disc in the bowl and roll in the chocolate to thoroughly coat.

Place back on the aluminum foil and freeze.

DSCN0214

Ready to enjoy immediately.

Store in the freezer and defrost a few minutes before eating or store  in the fridge.

Makes 50 pieces.

251

Bac’n, Cheddar, and Onion Omelette

DSC_0540So – how about a great brunch idea for a holiday weekend?  I know there is a lot of controvesry over even having a holiday named after Columbus, but all that aside, who isn’t happy for a day off and another excuse to have brunch?  I love brunch – it’s my favorite meal!  And I always loved omelettes with all the fixings and oozing with cheese.  Think vegans can’t have that?  Think again!  Enter the chickpea omelette.  There are lots of recipes online for chickpea omelettes and they are all wonderful!  I tweaked them and came up with this recipe that incorporates all of my son’s favorite things.  Since he was home from college for the weekend, I decided to make his idea of a perfect omelette.  You can put anything in the omelette that you like.  Mushrooms, peppers, tomato, capers, spinach – anything really!  While tofu scramble may technically taste more like eggs, because this is so reminiscent of the look and shape and texture of an omelette, it is amazing and it tastes great as well!  It is also so easy and quick to make!!

  • 1/3 cup chickpea flour
  • 1/4 t turmeric
  • 1/2 T nutritional yeast
  • 1/4 t baking powder
  • salt and pepper to taste
  • 1/3 cup + 2 T water
  • 2 t oil for cooking
  • 2 T chopped onions
  • 2 T chopped tempeh bac’n
  • 3 T shredded vegan cheddar, such as daiya

Combine first six ingredients in a small bowl.

Heat oil over medium high heat in an 8″ non-stick pan.

Pour batter into pan.  Sprinkle onions, bac’n, and cheese on top.

DSC_0525

DSC_0530

Cook 5 minutes.

DSC_0532

Fold in half and cook another 2 minutes.

DSC_0533

DSC_0535

Serve immediately.

Serves 1

DSC_0554

DSC_0558

DSC_0538DSC_0548

Chocolate Cherry Cups

cherryMaking raw desserts is so much fun and making raw candy is particularly satisfying!  When I first made raw peanut butter cups I was blown away at how incredibly delicious they were.  I have to give a shout out to the wonderful person behind the www.glutenfreevegangirl site – because her recipe is perfection!  It was also the inspiration for these chocolate cherry cups which I simply adore.  I have noticed that for some reason, there is only about one month per year when I can get frozen organic cherries.  I know this because I start missing the fresh ones that were around over the summer and I stock up on the frozen ones.  But one month from now, they will be hard to find.  So, I make lots of delicious desserts with cherries until I can no longer find them at all and have to wait for summer to come around again.  These candy cups are easy and fun to make and they taste great!  I like to keep them in the freezer because they defrost quite quickly.  I have been known, however, to be impatient and eat them frozen as well!

Chocolate layer:

  • 2 cups pitted dates
  • 1/2 cup plus 2 T cacao powder
  • 1 cup raw cashews
  • 2 pinches salt
  • 1 1/2 cups walnuts
  • 1 T water

Cherry filling:

  • 1 cup raw cashews
  • 1/2 cup coconut milk – not low fat
  • 1 T maple syrup
  • 1 t coconut oil
  • 1 t vanilla
  • 3/4 cup frozen cherries
  • 2 small pinches salt

In a food processor, process the walnuts and the water until it is the consistency of peanut butter.  Add the remaining chocolate layer ingredients to the walnut butter.  Process until it comes together.

DSC_0478

Line 3 mini muffin tins with paper liners (makes 36).

Divide chocolate into thirds.  Reserve one third.

Roll the remaining 2/3 into balls and then flatten in the palms of your hands.  See photos for size.

DSC_0479

DSC_0480

Place one flattened ball into each liner and press into bottom and up sides.

DSC_0482

Place all ingredients for filling in food processor and process until creamy.

DSC_0484

Spoon 1/2  t of filling into each liner.

DSC_0485

DSC_0486

With the reserved one third dough, roll and flatten smaller balls and place on top of each cup.

DSC_0487

Freeze until hardens, usually at least an hour.

Store in freezer.

DSC_0528

DSC_0491